Showing posts with label appetizer. Show all posts

Sunday, June 24, 2012

Chicken Wings in Cocoa-Hot Sauce

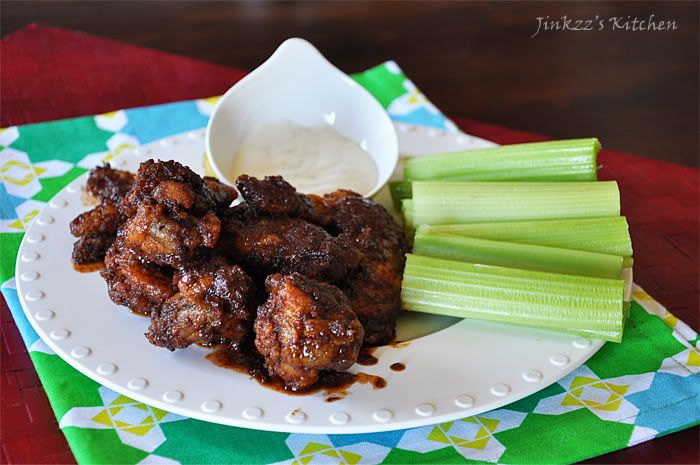
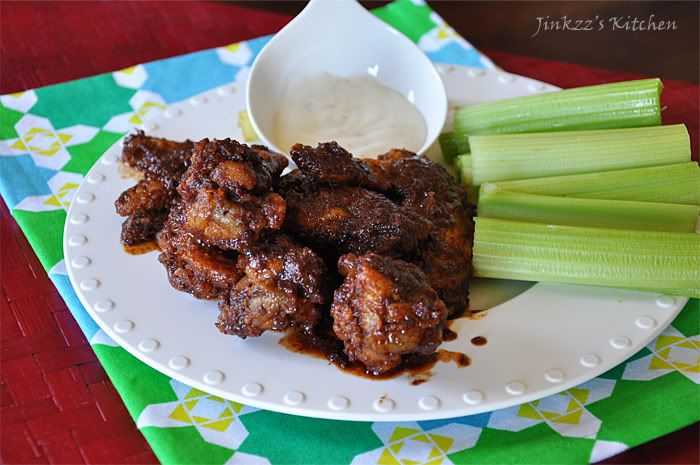
I like spicy chicken wings... I usually order a serving every time I place an order for pizza.  There is just something about it that can get very addicting and yummy.  They can be very messy to eat but I guess that is part of the charm in eating hot wings especially if you use your hands instead of the utensils :)

This recipe for chicken wings is based on a Good Housekeeping cookbook that my sister-in-law gave me recently.  I used cocoa powder instead of grated dark chocolate since I didn't have any in the house.  The result is a decadent variation of the classic hot wings that I do like very much.


Cooking this takes a few steps and several cooking vessels so be prepared to wash a mountain of dirty dishes afterwards...hehehe. I used one cooking pot for frying the chicken wings and another for the sauce.  I also used several plates for the preparation which was my mistakes since I should have used a ziplock bag for dredging the wings in seasoned flour.  That would have saved me a little bit of time and fewer dirty dishes...

The recipe calls for a cup of butter but I cut it down to half and still got a good result.  I do not like my food too greasy anyway so it worked out well.  Instead of using a regular hot sauce to make the dish spicy, I used a combination of kochukaro (Korean powdered chili) and Sriracha (Vietnamese hot sauce).  The kochukaro don't dissolve well so the sauce can be a little gritty but I liked it anyway.  You can adjust the spices to suit your taste but the proportion that I used (1 Tbsp kochukaro and 2 Tbsp Sriracha) was good enough for me- not too spicy but with enough hint of spiciness. 


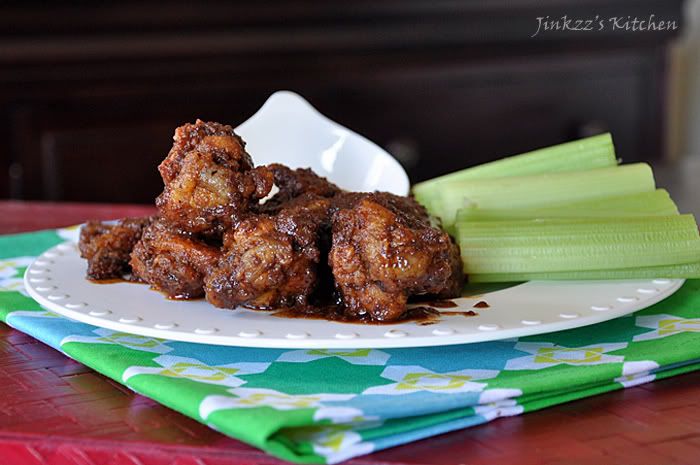
Dredging the chicken wings in seasoned flour before frying not only gives it a nice flavor but also makes it crunchy even after the sauce has been added.  I think that if you do not dredge the chicken wings in flour prior to frying, the wings will become soggy once the sauce is added.  The addition of cocoa powder in the sauce gives it a darker color and deeper flavor than normal hot wing sauce.  


Ingredients:

2 lbs chicken wings
3/4 All-purpose flour for dredging
sea salt and freshly ground pepper, according to taste.
1 Tbsp cocoa powder
2 Tbsp Sriracha hot sauce
1 Tbsp kochukaro (Korean chili powder)
1/2 cup butter, room temp
oil for frying

1. In a bowl, combine flour with salt and ground pepper.  Mix thoroughly

2. Dredge chicken wings in flour mixture, remove excess and set aside.

3. Heat oil in a deep pan.  Add a few chicken wings at a time and cook until done.  Remove from heat and place in a paper towel lined plate to absorb excess grease. Set aside.

4. Heat another pan over medium heat.  Add butter and cook until melted.

5. Add Sriracha and kochukaro. Cook for a minute or two then turn off the heat.

6. Stir in cocoa powder and mix until well incorporated.

7. Add wings to the hot sauce mixture and mix until every wing is coated with the sauce.

8. Transfer in a serving dish and serve with ranch dressing and slices of celery.

Thursday, November 24, 2011

Pesto and Breadcrumbs Stuffed Baby Portabello Mushrooms


I love portabello mushroom and I love pesto which makes this dish a perfect combination of the ingredients that I really like. This is part of the Thanksgiving meal which I cooked this year. The recipe is quite simple, fast and easy to make especially since I have ready made pesto which I made earlier this week so basically all I did was mix, stuff, and bake these babies. The pesto that I used is the arugula-walnut pesto (recipe here).

To stuff the portabello mushroom, just remove the stems from the caps and then using a teaspoon, scrape some of the mushroom cap off to create a bigger surface area for the stuffing. By the way, save those portabello stems for another recipe such as soup. Combine all the ingredients for stuffing in a small bowl and spoon on the mushroom caps. Bake for about 5-10 minutes and viola! you're are done.

Ingredients:

10-12 baby portabello mushrooms

Stuffing:

1/2 cup prepared arugula pesto sauce (recipe here)
1//4 cup (+ extra for topping) breadcrumbs
3 Tbsp freshly grated parmigiano reggiano
2 cloves garlic, finely chopped
non-stick spray

1. Preheat oven to 350F.
2. Spray some non-stick spray to your baking pan or lightly grease the pan using olive oil or just plain vegetable oil
3. Remove stems from portabello caps then using a teaspoon, scrape some of the mushroom cap off to make the opening bigger. Set Aside.
4. In a small bowl, combine pesto, breadcrumbs, and garlic. Mix well.
5. Spoon the stuffing into the mushroom caps, top with parmesan cheese and a little breadcrumbs.
6. Bake for 5-10 minutes or until heated through. Transfer to a serving platter and serve warm.

Tuesday, November 1, 2011

Burong Mangga (Pickled Mango)


Pickled mango...yummy! This is a Filipino appetizer recipe that is sure to whet your appetite and make you eat a lot. This dish is made by slicing unripe or slightly under-ripe mango and then pickling it in a vinegar, sugar, and salt mixture. This is a good accompaniment to any Filipino meal of pork, chicken, beef, or seafood.

I remember having mango in vinegar while I was growing up in the the province in the Philippines during summertime when ripe and green mango are in season and abundantly available. We have a variety of mango in the Philippines known as Indian mango which is perfect for this recipe but since that is not readily available, I just used the ones that are sold in the regular supermarket. One thing to remember though is that you need to use mangoes that are firm and slightly under-ripe to ensure that it is crisp and won't disintegrate when pickled. You need to peel the skin off and then slice the mango any way you want. I like slicing them in strips and thinly. Make sure you remove as much of the flesh from the stone as possible. If you choose to pickle whole mangoes, it is perfectly okay to do so as well. They can be refrigerated for about a week or so...that is, if they last that long. For me, it would be a miracle if they last more than 3-4 days as I can eat it with every single meal.

Ingredients:

3-4 unripe mangoes, peeled and sliced
1 cup white vinegar (I use cane vinegar)
1 1/2 cups sugar
1/8 cup salt

1. Heat pan over medium heat.
2. Add vinegar, sugar, and salt. Bring to a boil until everything is dissolved then remove from heat and let it cool.
3. Peel and slice mangoes then pack the sliced in a sterilized container.
4. Ladle the cooled vinegar mixture over mango and cover with top tightly.
5. Keep refrigerated.

Saturday, October 29, 2011

Balsamic Vinegar and White Truffle Oil Bruschetta


This is a nice starter to any meal because it is easy to make and packs great flavors. I think it only took me 15 minutes to chop, season, and assemble the entire dish. The secret to this bruschetta is the use of white truffle oil and balsamic vinegar combination which gives it an unusual earthy flavor.

Making bruschetta is very easy and takes just a few fresh ingredients such as tomatoes, basil, balsamic vinegar, olive oil, garlic, salt, and pepper. The bread is lightly toasted so that it is able to soak the liquid from the topping a little better plus it makes it taste better too. I use french baguette but you can use any bread of choice just make sure you slice it at an angle for a bigger surface area to hold the topping.

Ingredients:

1 loaf of french baguette, sliced into 1 1/2 inch thickness and then lightly toasted
5-6 Roma tomatoes, diced
2 cloves garlic, finely chopped
a small bunch of basil, roughly chopped
1 1/2 Tbsp balsamic vinegar
1 tsp white truffle oil
salt and pepper to taste

1. Lightly toast your bread in a toaster or oven.
2. In a bowl combine the rest of the ingredients and mix thoroughly.
3. Scoop the tomato mixture using a spoon and top it on you toasted bread.
4. Place on platter and serve.

Thursday, October 27, 2011

Kinilaw nga Kapayas (Papaya in Vinegar)


Kinilaw or kilawin means raw food marinated in vinegar. This dish is not really kilawin per se but vinegar is added to semi-ripe or under-ripe papaya to add flavor. This is a common dish in the Visayan region of the Philippines. It can serve as an appetizer or an afternoon snack, which ever you prefer. Under-ripe or semi-ripe papaya has not fully ripen so the taste is slightly bland or just slightly sweet. The addition of vinegar and salt gives it a nice flavor but I recommend not to leave the papaya in vinegar too long because it will lose its crispness as well as become too sour to eat.

Ingredients:

1 under-ripe or semi-ripe papaya, seeded and peeled then sliced
1/2 cup vinegar
salt, according to taste

1. Combine everything together in a bowl and serve.

Thursday, October 6, 2011

Spinach Pouch


I have been experiencing a publishing backlog lately because my ability to cook and take pictures is a lot faster than my ability to post and publish them. I really do love to cook and enjoy taking pictures just a little bit more than before. My problem is that sometimes I get too lazy to start typing. Other times, I just don't know what to say. Not a problem though as I am positive that I will be able to get them all posted in due time :)


Before I talk about the dish that I have created today, I have to say thank you to everyone who came and visited my blog. I have to say that tastespotting, foodbuzz, and foodgawker has done wonders to increasing the traffic in my blog. And please do leave me a comment as I always welcome and enjoy reading them.

The dish that I created today is an appetizer that is so easy to make. I used four main ingredients plus pepper and salt to create this dish. The filling can be easily substituted with whatever is readily available. The filling can also be changed into a sweet filling to make it a dessert instead of an appetizer. I would say that the possibility is endless. Today though I used frozen spinach, cream cheese, and ricotta cheese as filling. Make sure that you thaw the frozen spinach well ahead of time to prevent any delay. I thawed mine in the refrigerator overnight and then used chesse cloth to squeeze it dry. Making sure that all the fluids has been removed is important because you do not want a soggy pouch when fried plus the water will also make frying difficult as it will cause oil to splatter.


Another important thing to remember when using wonton or spring roll wrappers is that they dry out easily so make sure that you cover them in damp (not soaking wet) cloth to prevent them from drying out and turning brittle. To help the pouch retain its shape, I let it air dry a little bit after I wrapped the filling so that it becomes stiff thus helping it hold the shape better. These pouches can be kept in the freezer and then taken out when needed. I usually don't thaw them out before frying so they just go from the freezer to the hot oil. You need to be careful though as oil may splatter when it comes in contact with the frozen pouches. Also, use splatter guard to prevent oil from splattering all over you and your kitchen.

Ingredients:

1 box (10 oz) Frozen chopped spinach, thawed and squeezed dry
4 oz cream cheese, softened
1/2 cup ricotta cheese
Large size wonton wrappers
oil for frying
sea salt and freshly ground pepper, to taste


1. In a bowl, placed squeeze-dried spinach. Fluff them up to loosen.
2. Add cream cheese and ricotta cheese. Mix well.
3. Season with salt and pepper according to your taste.
4. To wrap: Take a teaspoon full of the filling and place it in the middle of the wonton wrappers. Gather the corners to create a pouch. Take small stips of the cut wonton and use it to tie the corners together. Be careful not to break the tie.
5. Do this until all the filling has been used.
6. Heat oil in a pan. When oil is hot, place a few of the pouch and fry until golden in color. NOTE: Fry only a few at a time so as not to lower the oil temperature and not to overcrwod the pan.
7. Transfer to a paper towel lined plate to drain excess oil.
8. Transfer to a serving platter and serve warm.

Monday, September 26, 2011

Green Papaya Salad with Beef Jerky (Goi Du Du Bo Kho)


I remember eating a Vietnamese salad a while back and it tasted really good so I wanted to recreate it at home. I adapted this recipe from Viet World Kitchen but I modified it a little bit.

Papaya trees are abundant in the Philippines and usually used in several dishes such as atchara (pickles) or in a chicken stew. It can also be eaten raw both in its unripe or ripen stages. Unripe or underripe papaya can just be sliced and eaten with salt and vinegar while ripe papaya can be eaten by itself or grated then mixed with sugar and milk. Anyway you want to eat your papaya is fine as long as you add something to it. Eating papaya by itself can be a little bland unless it really ripe. There are varieties in the Philippines that are sweet when ripe and others that remains bland even when they are fully ripe. To me, the here is nothing compared to those foundin the Philippines but it could just be me and my preference :)

Anyways, this Vietnamese papaya salad is quite tasty thanks to the dressing which is a combination of sweet and spicy. I do think it is better to serve the dressing on the side so that each person can adjust it according to preference rather than dumping all the dressing on the entire salad. Plus, it makes it looks nicer too to serve the dressing and salad separately. I am not really a huge fan of the color of the dark soy because it looks too dark (to me) and makes the salad look unappetizing.

Dressing:
3 tablespoons regular (light) soy sauce
1 tablespoons dark soy sauce
1 tablespoon unseasoned rice vinegar
1 tablespoons sugar
1 or 2 Thai chillies, finely chopped (you can remove the seed if you prefer it less spicy)

Combine all ingredients and mix until sugar is dissolve. Set aside.

2 cups unripe papaya, peeled then julienned
1 teaspoons salt
4 ounces Asian-style beef jerky, julienned
a handful of basil,sliced thinly


1. Peel papaya, remove and discard seeds then julienne using a mandoline slicer. NOTE: Be careful not to cut your fingers.

2. Place papaya in a bowl then add salt. Let it stand for 15 minutes then squeeze as much of the fluid out. You can either do it by hand or use a cheese cloth to wring the fluids out. Discard any liquid.

3. Transfer to a clean bowl then fluff to loosen.

4. Add beef jerky and basil and toss lightly. Serve with dressing on the side.

Saturday, September 24, 2011

Firecracker Shrimp


I remember having these wonton wrapped shrimps years ago but cannot remember when and where exactly I had them. My memory seem to tell me that i saw someone cooked this in food channel and I tried to recreate it at home but that memory seem blurry that I am not even sure if I am remembering things correctly. Anyways, to make the long story short, I had some shrimps which I thawed in the refrigerator overnight and could not think of any dish to make. Then I saw some wonton wrappers which were leftover from when I cooked shrimp and squid mini lumpia rolls which gave me an idea on making some firecracker shrimps. For the life of me though, I cannot remember what the marinade for the shrimp was so I searched the net and landed in Jaden's (of steamy kitchen)blog with a recipe for firecracker shrimp. She has soe good pointers on how to make sure the shrimp doesn't curl up when fried which I used and viola! the shrimps stayed straight. I made made some revision on the marinade that I used though but the end result is still amazing. I also used sweet and sour mango sauce instead of sweet chili sauce.


Ingredients:

15 shrimps, deveined and shelled with tail part left in
15 wonton (0r 8 eggrol wrappers cut into two triangles) wrappers
2 cloves garlic, finely chopped
1 inch ginger, finely chopped
2 tsp lite soy sauce
1/4 to 1/2 tsp sugar
1/2 to 1 tsp freshly squeezed lemon juice
sea salt and freshly ground pepper, according to taste
2 Thai chili, seeded and finely chopped


1. Combine garlic, ginger, soy sauce, sugar, lemon juice, salt and pepper. Mix well and add shrimp. Make sure that shrimps are coated with marinade well. Marinate for about 30 minutes.
2. After 30 minutes, drain marinade and pat shrimps dry to absorb excess marinade.
3. Make a few small incisions along the inner section of the shrimp ( see jaden's illustrations here)
4. Wrap 1 shrimp using 1 wonton wrapper and wrap shrimp with tail sticking out. Wet the end of the wrapper to fasten (make it stick) in place. Do this until all of the shrimps has been wrapped.


5. Heat oil in a pan over medium heat and deep fry shrimps until golden brown. Make sure you do not overcrowd the pan as that will bring the oil's temperature down.
6. DRain excess oil by placing fried shrimp in paper towel lined plate.
7. Transfer to a serving platter and serve with sweet and sour mango sauce (recipe here)

Thursday, September 15, 2011

Squid and Shrimp Mini Lumpia (Spring Roll)

Inspired by the squid and shrimp balls that I made yesterday, I ventured into making mini lumpi today. Ha! I woke up really early for this one too because I just woke up with visions of these crispy, fried (translation: fattening and greasy...hehehe)but oh-so-yummy babies. Lumpia, as we call them in the Philippines, is otherwise known as spring roll. It is similar to chinese spring rolls. The filling is wrapped in spring roll wrapper and then fried until golden in color. There is an endless possibility for what you can use as filling...you are only limited to your imagination. Traditionally, we use ground pork with spices, veggies, and some fillers such as bean sprouts, chesnuts, and even mashed tofu. This one though is slightly different partly because the ingredients are pureed in the blender before they are wrapped in wonton (not spring roll) wrappers. Wonton and spring roll wrappers are basically the same except that wonton wrappers are smaller compared to spring roll wrappers. To round up this dish, I used sweet and sour mango sauce instead of the catsup-based sweet and sour sauce.


Ingredients:
1 lb squid, cleaned and sliced
1 lb shrimp, shelled and deveined
3 cloves garlic, chopped
1 shallot, chopped
2/3 cup carrots, cpopped
1 egg yolk
1-2 Tbsp oil
sea salt and freshly ground black pepper, to taste
oil for frying


I. Bring a pan of water to a boil.
2. Blanch squid for about 30 seconds to 1 minute in hot water then drain.
3. Add shrimp, squid,garlic, shallot, carrots, sea salt, egg, and pepperto a food processor. Pulse until pureed and well incorporated. Drizzle oil (1-2 Tbsp) and continue to process until it starts to form a ball.
4. Take a piece of wonton wrapper and lay it on a plate. (NOTE: Keep the rest of the wonton wrappers covered with damp towel to prevent it from drying out.)
5. Add about a tsp of the mixture and wrap. NOTE: See pictures on how to wrap.


NOTE: Wet the tip of the wonton wrapper to make it stick when you roll
6. Continue wrapping until all of the fillings have been used. NOTE: You may dredge lumpia in flour before frying fo a crispier lumpia that stays crispy for a while. Be sure to remove excess flour though before frying.
7. Heat oil in a pan over medium heat.
8. When oil is hot, add lumpia a few at a time and fry until golden in color. Do not overcrowd you pan as it will lower the oil's temperature resulting in a soggy lumpia. NOTE: Be careful as this may cause oil to splatter all over your stove and on yourself.
9. Transfer to a paper towel lined plate to drain excess oil. When frying is done, transfer to a serving dish and serve warm with sweet and sour mango sauce.

Squid and Shrimp Balls with Sweet and Sour Sauce

This is considered a street food in the Philippines and is commonly sold by a vendor who goes around pushing his cart trying to find a good location with which to park it. The cart is equipped with a stove that is powered by a portable gas tank. The sauce range from sweet to spicy and there is usually three different varieties of sauces to choose from. Squid balls isn't really very common compared to its cousin, fishball, in Bacolod or Silay where I came from.


I first tasted squid balls in Manila. I remember eating this from a food stall in one of the malls in Manila, the capital city of the Philippine Islands. I remember that there is always a long line in that stall with people who buys their product range from students to professionals. Ahhh, those were bittersweet days that I spent in a very crowded, traffic congested, and fast moving city which was, and still is, so far from the easy and laid back lifestyle which I was accustomed to in the province and city where I grew up.

This recipe is not the same recipe that they use for street food cart but it is loosely based on a squid ball recipe from CD Kitchen.


Ingredients:
2 lb squid, cleaned and skin removed
1 lb shrimp
1 small shallot chopped
3 cloves garlic, chopped finely
1 egg yolk
a pinch of paprika
sea salt and freshly ground black pepper, to taste
oil for frying

1. Clean and slice squid into rings.
2. Bring water to a boil in a saucepan.
3. Blanch squid in boiling water for about 30 seconds to 1 minute.
4. Place squids, shallot, shrimps, egg yolk, garlic, salt, and pepper in a food processor and process until smooth.
5. Add 1-2 Tbsp of oil and continue to process until it starts to form a ball.
6. Remove from the processor and shape into small balls. NOTE: To form mini-balls, take a little bit less than a teaspoon full of mixture and use two teaspoons to form it into a ball. Drop the formed balls into hot oil as you make them.
7. Heat oil in a pan and deeep fry squid balls until golden brown in color. NOTE: Be areful not to burn yourself. Use spaller screen to prevent oil from splattering all over you and the stove.
8. Remove from heat and place on a paper towel lined plate to drain oil. NOTE: Make sure that the squid ball is cooked through. Adjust the fire so that the outer surface does not get burned while the center cooks.
9. Transfer to a serving dish and place toothpick on each. Serve with Sweet and Sour Sauce ( Recipe here)