Showing posts with label dessert. Show all posts

Sunday, June 10, 2012

Banana-Walnut Loaf


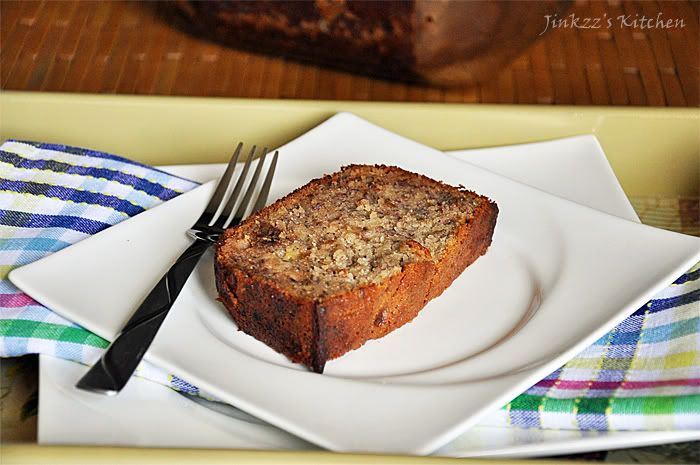
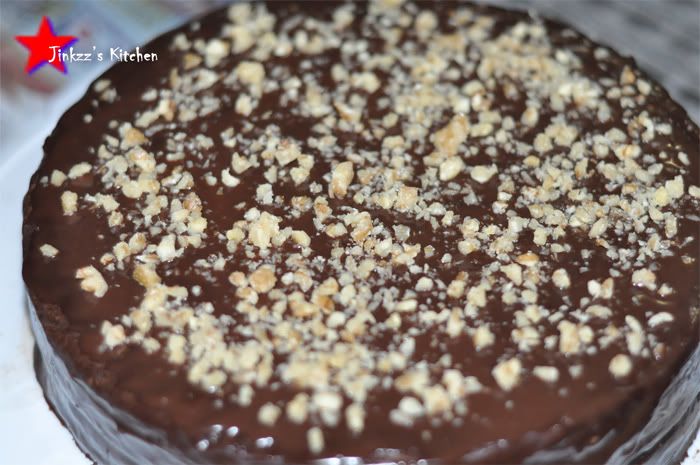
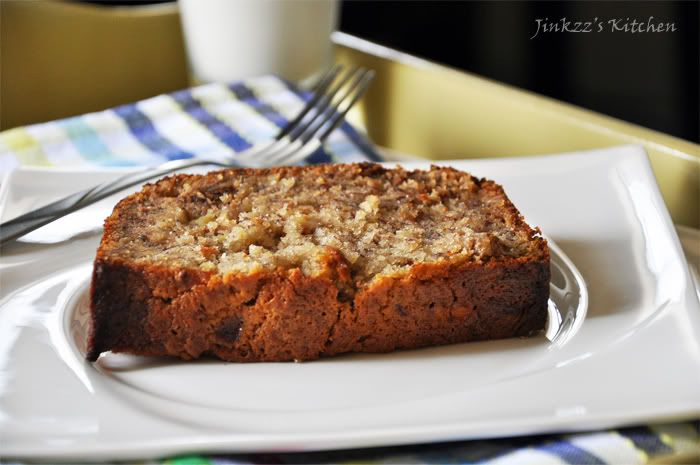
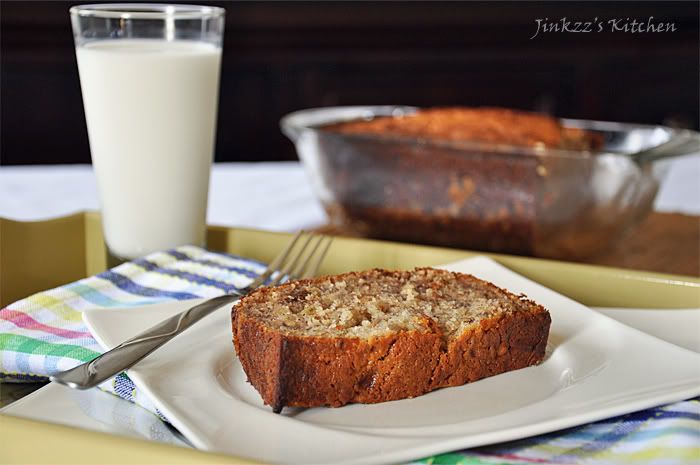
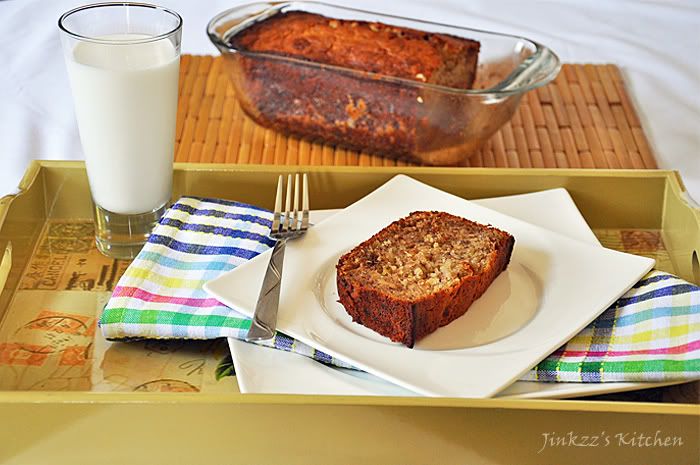
Aside from the fried/baked pork dish that I cooked, I also baked banana-walnut loaf.  There wasn't any special reason other than the fact that I had bananas that were getting too ripe for my liking.  I do not even know why I bought bananas in the first place since I am not much of banana eater.  Maybe I was thinking of making a shake or something but for some reason I got sidetracked and ended up with overripe ones...hehehe...no problem though as this dish save them.


Bananas. by the way, are great ingredients in making your smoothie a lot creamier without adding too much milk or dairy products.  It can even be used instead of the dairy products.  I slice them about an inch to a couple of inches in size and then wrap them in parchment paper and freezer bags.  Pop them in the freezer until they are frozen and use them instead of ice to make a smoother and creamier smoothie.  I believe I posted about this tip somewhere in the blog about a year ago.


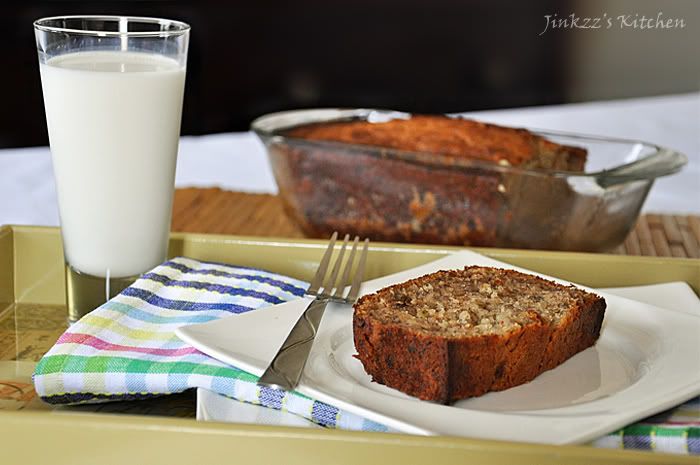
Anyways, I had some overripe bananas and free time so I baked these babies.  I used a little bit of olive oil along with the butter when I made these.  The result is a very moist and slightly dense banana cake that taste really good.  They taste even better the following day...even after they have been in the fridge overnight.  To make them soft and moist after being the fridge, I usually pop a slice in the microwave and heat for about 10-15 seconds but the time will be dependent on your microwave.


This morning I had a cup of coffee with a slice of banana walnut loaf  and a very hilarious episode of a Korean drama that is currently airing entitled "A Gentleman's Dignity"  It stars Jang Dong Gun and Kim Haneul along with a bunch of other korean actors/actresses.  Jang starred in an American movie entitled "A Warrio's Way" with Kate Bosworth in 2010.  I only watched the first part of that movie but it didn't pique my interest so I didn't finish the entire movie.  A Gentleman's Dignity though is different-it is hilarious, witty, sexy, crazy, heart-warming, and heart-wretching all at the same time.  The dialogue exchanges between Haneul and Dong-gun are really good. Right now, they have about six episodes out and I cannot wait for the next installment.  I didn't think I would say this but the writer (who is also the writer for Secret Garden which I did not like)  is doing a good job and hope she will continue to do so until the end....


Ingredients:

1/4 cup butter, softened

2 Tbsp olive oil

1/2 cup sugar

1/2 cup honey

2 eggs

4 large ripe bananas, mashed

1/2 tsp pure vanilla extract

1 1/2 cups all-purpose flour

a pinch of salt

1/2 tsp baking soda

1/3 cup walnuts, chopped

1. Preheat oven to 350F


2. Spray loaf baking pan with non-stick spray or coat evenly with oil.


3. In a bowl, sift together flour, baking soda, and salt.  Mix well and set aside


4. In another mixing bowl, add butter, olive oil, honey,and sugar.  Beat until light and fluffy.


5. Add eggs one at a time, beating well after each addition.


6. Stir in mashed banana and vanilla.  Mix well.


7. Add flour-baking soda mixture and mix into the batter.  Do not overmix .  


8. Stir in walnuts and transfer to a loaf baking pan and bake for 1 hour or until a knife inserted in the middle comes out clean.


9. Remove from the oven and let it cool slightly before slicing and serving.


Saturday, October 22, 2011

Ginataang Mais (Sweetened Corn in Coconut Milk)


This is a classic Filipino recipe which is usually served as an afternoon snack. It is made of cream style corn, whole corn kernels, sweet rice (also known as glutinous rice), and coconut milk. Sugar is added to sweeten it. It can be served either warm or cold. The coconut mil as well as the cream style corn gives it a creamy and rich flavor and texture.


Dishes that uses coconut milk, like this one, is very common in Asian cuisine and Filipino cuisine is no exception. You can usually buy canned coconut milk in Asia market but I remember back in the days in the Philippines, canned coconut milk was not readily available (not sure if it is now) and most household usually grate their own coconut meat then painstakingly extract the coconut milk manually. That is a really hard process and I do not know if I will be able to do that now...too much work is involved in extracting the coconut milk. The advantage of doing that though is that the coconut milk taste fresher. Another advantage is that it is thicker because you can opt not to add water if you want.


Ingredients:

1 (14 oz) can cream style corn
3/4 cup frozen corn (you can also use canned corn)
3 cups coconut milk
1 cup sweet (glutinous) rice
sugar, according to desired sweetness
6 cups water

1. Place a large pot over medium heat.
2. Add sweet rice and water. Simmer until rice is soft and almost all of the water has been absorbed. Stir occasionally to make sure that the bottom doesn't burn.
3. Add the rest of the ingredients and continue to simmer until corn is soft and done.
4. Remove from heat. May be served cold or warm.

Monday, October 10, 2011

Turon (Banana and Jackfruit Wrapped in Spring Roll Wrapper)


It's just another manic monday...wish it were sunday...coz that's my fun day...hahaha...whoa! where did that come from? Gosh it has been a while since I heard that song which would probably clue you in on how old I am...hehehe...Ahhh, I think I am really getting old because there are a lot of things that I used to be alble to do that I can't do anymore. It's okay though because getting old can be compared to an old wine that only gets better with age...hehehe.

Today, I made turon which is a fried Filipino dish made of banana and jackfruit wrapped in spring roll wrapper then coated with syrup. This can either be served as dessert or snack. It is sometimes sold by street vendors usually around mid-afternoon. Ahhh, that brings back old memories...

The banana used in this recipe is saba (burro) banana which is commonly found in the Philippines. This variety has a thick peel and usually shorter than a regular banana found in the regular American supermaket. The taste and texture also differs from the regular banana. Jackfruit, on the other hand, is also common in the Philippines but it can also be found in other parts of Asia such as Bangladesh, India, Thailand, and Malaysia. It is a huge fruit which has several segments and each segment encloses a huge seed (about the size of a chestnut). It can be eaten raw once it has ripened or used in dishes when it is in its unripen stage. In the States, canned jackfruits are available in Asian markets. Frozen jackfruits can also be found in Filipino stores.


Turon coated with syrup
Ingredients:

6 ripe burro banana, cut into quarters lengthwise
1 can jackfruit, drained and then slice into thin strips
spring roll wrappers
brown sugar, according to desired sweetness
oil for frying

1. Take a quarter of banana and few slices of jackfruit. Place in the middle of a spring roll wrapper then sprinkle with a quarter of tsp of brown sugar.
2. Wrap as shown in the pictures. Moisten the end with water to secure.


3. Do this until all of the bananas and jackfruit has been used up.
4. To fry, heat oil in pan over medium heat. When oil is hot, add a few turon and fry until golden in color.
5. Transfer to a paper towel lined plate to drain excess oil.
6. Transfer to a serving platter and serve with muscovado syrup.

Muscovado syrup:
1 cup muscovado (or you can use brown sugar)
1/2 cup water

1. Place a pan over medium heat.
2. Combine muscovado and water and stir until dissolved
3. Cook until syrup thickens
4. Serve with turon.

Sunday, October 9, 2011

Cinnamon Fruit Pouch with Warm Cinnamon sauce


This is a variation of the spinach pouch that I posted a couple of days ago. This one is a sweet version which can either be served as a snack or dessert. I used apple, pear, and peach for this recipe which I sprinkled with cinnamon and brown sugar then wrapped in a wonton wrapper.

The fruits will produce liquid when sprinkled with sugar and makes it a little harder to wrap in wonton wrapper as it will tear easily. The trick that I used is to let the fruit and sugar/cinnamon mixture stand for about 15 to 20 minutes then I drained and discarded the liquid. Even after I drained the liquid, I noticed that the bottom of my pouches was becoming soaked with the liquid so I wrapped the pouches again in another wonton wrapper which seemed to do the trick. I also placed the pouches in the freezer for about 20 minutes just to harden any fluid that may have formed.


When frying these pouches, the temperature of the oil is very important. It has to be hot enough that the frying and browning of the wonton wrapper will only take a short time as this will help harden and make the wrapper crispy. Make sure not to overcrowd the pan so as not to lower the oil's temperature Be careful though when frying in hot oil as it may splatter and burn you. As always, use splatter guard to prevent the oil from splattering all over you and your kitchen.

Although the wonton wrapper stays crisp for a while once fried, it is better to serve these warm as the taste is not as good when it has cooled. The possibility of the bottom turning soggy is also higher the longer the pouches sits after it has been fried. I served these with warm cinnamon sauce. Too bad I did not have any vanilla ice cream...I think this would also go well with it.


Ingredients:

1 apple - peeled, cored, and diced finely
1 peach - peeled,cored, and diced finely
1 pear - peeled, cored, and diced finely
2 Tbsp brown sugar (adjust according to desired sweetness)
1/2 tsp cinnamon powder
wonton wrappers
oil for frying

1. 1 a large bowl, mix apple, peach, pear, cinnamon and sugar. Let is stand for 15 to 20 minutes
2. Drain any fluid that has accumulated.
3. Take a tablespoon full of filling and place in the middle of a large wonton wrapper. Gather the edges to form a pouch then twist slightly adn pinch to seal.
4. Take another wonton wrapper and repeat the same procedure. Use small strip of wonton wrapper to tie and secure.
5. To fry: Heat oil over medium high heat. Fry 3-4 at a time, making sure not to overcrowd the pan. Fry until golden in color.
6. Drain excess oil in a paper towel lined plate.
7. Transfer to a serving platter and serve with warm cinnamon sauce.


Warm Cinnamon Sauce

Ingredients:

1/4 cup sugar
2 Tbsp flour
1 cup water
2 Tbsp lemon juice
1 Tbsp butter
1 tsp cinnamon
1/4 tsp nutmeg
1/4 tsp allspice

1. Heat saucepan over medium low heat. Combine sugar, flour, water, and lemon juice. Mix until sugar and flour is dissolved.
2. Continue stirring and cook until it thickens.
3. Add butter, cinnamon, allspice, and nutmeg. Mix until dissolved and well incormporated.
4. Strain mixture to remove undissolved particles.
5. Serve warm


Sauce recipe adapted from here

Friday, September 23, 2011

Che Dau Xanh (Vietnamese Sweet Mung Bean Dessert)


Chuseok is one of the biggest Korean holiday. It is equivalent to American thanksgiving where people go home to their hometown and tend to cook and eat too much. Of course, as an avid South Korean enthusiast, it has become part of my yearly celebration. This year, I fully intended to conquer the art of songpyeon making. Songpyeon is a Korean rice cake which is commonly served during chuseok. The day before chuseok, I woke up really early. How early? 630 in the morning. That is really significant for me because I rarely sleep before midnight therefore my waking hours is usually later than 9 am. Anyways, I woke up really early and went to the Korean market to buy things I need for songpyeon. Of course knowing me, I went and bought way too much which included ingredients for three different fillings. One of those fillings happen to be split mung beans. Well, I made several attempt at making songpyeon, all of which were deemed a failure. So here I am eleven days later with tons of leftover ingredients and don't really know what to do with them...hehehe


I began searching the internet last night and found a split mung bean desert recipe that looked easy enough. The recipe is a sweet Vietnamese street food which uses coconut milk, sugar, and split mung bean soup. I have all of those ingredients in my cupboard so it was convenient. The recipe calls for soaking the mung beans for three (3) hours and then boiling it in water until almost all of the fluid is absorbed then in a separate pan, you bring coconut milk and sugar to a slow simmer until sugar is dissolved then add the mung bean mixture. I topped the dessert with lightly toasted sweetened coconut which gives it another flavor dimention plus the aroma of the toasted coconut is just heavenly. The recipe is easy enough but takes a few steps to finish the dish. The outcome? it was awesome...Sweet, creamy, tasty. Perfect for an autumn afternoon snack or dessert. It reminds me of a Filipino sweetened mung bean snack only this one is creamy and rich. This is a keeper for me.


adapted from here

Ingredients:

1 cup split mung beans
2 cups coconut milk
1/4 cup sugar, adjust according to taste
1/4 cup sweetened coconut flakes.

1. Place mung beans in a strainer and rinse then place in a container. Add water to slightly above the level of the mung beans and let it soak for at least 3 hours.
2. After 3 hours, drain water, rinse mung beans and place in a sauce pan. Add about 500 ml of water and let it simmer until almost all of the fluid has been absorbed. NOTE: Make sure you keep an eye on it and stir occassionally to prevent burning mung beans especially at the bottom of the pan.
3. Place coconut flakes in a pan and lightly toast over medium low heat. Remove form fire and set aside to let it cool.
4. Remove from heat and let it cool before placing it in a food processor to puree.
5. Heat a clean pan over medium heat. Add coconut milk and sugar and stir until sugar dissolves. Let it simmer for 3-4 minutes.
6. Add mung bean mixture and mix well. Cook until heated through.
7. Remove form heat and transfer to warm containers. Top with toasted coconut flakes and serve immediately.

Sunday, September 18, 2011

Chocolate Lover's Cake

Who can resist chocolate? There would not be too many I am sure. There is something about it that makes people smile and happy. I think it is its theobromine and phenethylamine components which produces a physiological effect on the body as well as its ability to stimulate the production of serotonin in the brain. I would say though that it can be considered as one of the pleasures in life that I really enjoy and love. All the other reasons (physiology mambo-jambo) are insignificant...hehehe. Chocolate is thought to have originated from Central and South America where cacao has been cultivated for at least three centuries.

This is a very rich, chocolate-y cake that is sure to make any chocolate lovers smile from ear to ear. This is a cake that I made for hubby's birthday. It has a chocolate cake base, a nutella filling, topped with chocolate ganache and sprinkled with nuts. Hahaha. I told you it will be chocolate-y. I have to confess though, I love chocolate but only in small doses as it gives me a headache and I break out into the tiniest rashes (?) on my face but that doesn't deter me from enjoying them. The cake though is so rich that I could only partake a very small slice lest I want to have a full-blown migraine as a result of eating too much chocolate in one sitting...hehehe...As a bonus, I was even able to make chocolate truffles, the recipe of which I posted here as well.


Chocolate cake base:
adpated from Hershey's Kitchen

Ingredients
2 cups sugar
1-3/4 cups all-purpose flour
3/4 cup good quality Cocoa
1-1/2 teaspoons baking powder
1-1/2 teaspoons baking soda
1 teaspoon salt 2 eggs 1 cup milk
1/2 cup vegetable oil
2 teaspoons vanilla extract
1 cup boiling water

Filling :
Nutella (Chocolate Hazelut Spread)

Frosting;Chocolate Ganache

Ingredients:
1 cup chocolate chips, semi-sweet
3/4 cup heavy cream


Directions for Cake:
1 Heat oven to 350°F. Grease and flour two 9-inch round baking pans.


2 Stir together sugar, flour, cocoa, baking powder, baking soda and salt in large bowl. Add eggs, milk, oil and vanilla; beat on medium speed of mixer 2 minutes. Stir in boiling water (batter will be thin). Pour batter into prepared pans.


3 Bake 30 to 35 minutes or until wooden pick inserted in center comes out clean. Cool 10 minutes; remove from pans to wire racks. Cool completely.

Direction for ganache:

1. Using a double boiler or heat proof bowl over a pan with water, place the crean on the bowl and heat gently until warm.
2. Add chocolate chips and stir until mixture is smooth and glossy.
3. Remove from heat and cool a little bit before using it to frost your cake.

To Assemble:

1.Take 1 of the cake and place it on yur cake server.
2. Trim to the top to make it flat. Do the same with the other cake (NOTE: You can save thatportion and use it to make chocolate cake truffles.)
3. Spread nutella on the top area and spread evenly.
4. Take the second cake, invert it and place it on top of the other layer.
5. Apply frosting and then refrigerate for an hour or more until ganache somewhat hardens.

Wednesday, September 14, 2011

Orange and Pistachio in Orange Blossom Water

Ahhh...what a wonderful morning... is what I am hoping *crashes back down to the land of the living and my reality*... hehehe... had to wake up early today because I have so much to do and too many errands to take care of. I really need to get moving again so I thought I would start my day by walking a little bit...whew easier said than done especially when it is humid. After all that sweating and walking, I need something to refresh me and get me ready to face this day. I like this dish because it does not involve any cooking. Its my take on grapefruit breakfast except that I am using oranges instead of grapefruit. To me, they are the same. Both are rich in Vitamin C although some studies have suggested that grapefruit can help you lose weight. Hmmm, does it? I have no idea. Personally, I prefer oranges better in terms of taste. Grapefruit tends to to have a bitter taste, or is it just me? Even pink grapefruit does taste slightly bitter to me. Not for lack of trying, believe me I have tried plenty and they all taste bitter. Maybe I just have not found a sweet grapefruit yet. Anyways, I still think oranges taste better...hehehe...


I am using orange blossom water as a "dressing" which I purchased from monieur Marcel at the the farmer's market in Third and Fairfax yeaterday. Orange blossom water are made from Seville orange blossoms which are left to steep for 2-3 weeks. Who has the time to do this? I would probably do it if I have access to orange blossom but since I don't, I bought some ready made orange blosson instead. Orange blosson water is commonly used in Persian and Arabic cooking.

Ingredients:
2 oranges
2 Tbsp pistachio, shelled and chopped roughly
1 Tbsp orange blossom water

1.Peel oranges using a knife to remove skin and pith. NOTE: You can save the skin (without the pith or the white part) to be used in another dish if you wish.
2. Slice into 1/2 an inch thickness. Try to save some of the juice that have accumulated while slicing the oranges.
3. Combine juice and orange blossom water and pour it over the sliced oranges.
4. Refrigerate for at least 30 minutes.
5. Remove from the refrigerator and sprinkle chopped pistachio on top.


Adapted from The Three Ingredients Cookbook by Jenny White

Saturday, September 3, 2011

Baklava

Baklava is a rich and sweet Greek dessert made of buttery sheets of phyllo dough and nuts drizzled with syrup or honey. It is sometimes flavored with cinnamon and cloves. Its origin is unknown but some think that it originated from Turkey.

For those who has never worked with phyllo dough, this can be a little daunting since they easily dry out and tear. The key is to make sure you cover the dough in damp (not soaking wet) towel while you assemble. If the dough is frozen, make sure to thaw it completely. I usually thaw mine in the refrigerator for a day before I use them. It just makes it easier to handle since they easily separate from one another. When you brush the butter, just apply a light coating instead of drowning the sheet.


Ingredients:

16 oz. package of phyllo dough
3/4 cup melted butter

Filling:

1 cup pecans, coarsely chopped
1 cup walnuts, coarsely chopped

Syrup:

1 cinnamon stick, broken into half
1 cup water
1 cup sugar
1 tsp vanilla extract
1/2 cup honey
3 strips of lemon rind (about 2-3 inches long each)

To make the syrup:

1. Using a begetable peeler, peel the outer skin of the lemon. Make sure you are only taking the yellow portion and not the pith (white part)

2. Heat sauce pan over medium. Add water and sugar. Heat while stirring occassionally until sugar is dissolved.
3. Add cinnamon stick, lemon peel, vanilla, and honey
4. Continue to simmer for about 10-20 minutes.
5. Remove from heat and strain to remove cinnamon stick and lemon peel.
6. Let it cool completely before using.

To assemble Baklave:

1. Mix pecans and walnuts in a bowl and set aside.
2. Preheat oven to 350F.
3. Butter the bottom and side of a 9X13 baking dish.
4. Place a layer of phyllo dough at the bottom of the baking dish then lightly butter. Add another layer and butter the top again. Continue to do this until you have around 6-8 layers of buttered phyllo dough.


5. Sprinkle mixture of walnut and pecans over the top of the phyllo dough stack and pour about 2-3 Tbsp of cooled syrup.

6. Place another later of phyllo dough over the nuts layer and brush with butter. Repeat this 3 times then add a layer of mixed nuts and syrup.
7. Stack another 3 layers of buttered phyllo dough then a layer of nut mixture and syrup. By now you have 3 nut layers.
8. For the top layer, stack 6-8 layers of buttered phyllo dough.
9. Cover with plastic wrap and refrigerate for about 10-15 minutes. NOTE: This solidifies butter thus making it easier to cut.
10. Cut the uncooked Baklava into 2X2 inch squares (or, diamond if you prefer).

11. Bake for about 30-40 minutes or until the top turned golden brown.
12. Remove from the oven and drizzle syrup all over the hot baklava. NOTE:You don't have to use all of the syrup is you don't want it to be too sweet.


13. Let it cool for about 1-2 hours(preferrably longer to allow the baklava to soak up all of the syrup) before removing from tray and serving. Do not cover while you are letting it cool.


Mango Panna Cotta with Honey Mango Sauce


What can I say? I rediscovered panna cotta and fell in love with it. This recipe is different from the mango jelly panna cotta which I posted here. This one is just as delish as the other one. Again, I used the nestle table cream which I got from the Filipino store but I had to cut it down to 1/2 cup instead of the usual 1 cup because it was too creamy and used more milk instead. The result is still very creamy, light, and very flavorful. The mango lends a nice refreshing taste to the dish. I also drizzled it with honey mango sauce which made it taste so divine. You can totally skip the honey mango sauce though if you prefer. The mango panna cotta is able to hold its own without any accompaniment. I also strained the mixture three time: after I pureed the ingredients, after I took it off the stove, and when I poured in the molds.


Ingredients:

Mango Panna Cotta

1/2 cup mango puree
1/4 nestle cream
1 1/2 cup milk
2 tsp unflavored gelatin
1 Tbsp water
1/4 cup sugar (you can adjust according to taste and how sweet your mango is)


1. In a small bowl, sprinkle gelatin over water to soften
2. Peel and dice mango, place in a blender with sugar and blend until smooth.
3. Add milk and blend some more. Transfer into the sauce pan, add cream and stir to incorporate well. NOTE: I accidentally added my cream to the mixture in the blender which whipped it up a little bit and explained why there was a lot of bubbles on top when I transferred the finish product to the mold :)
4. Simmer, but do not let it boil,for a few minutes until hot.
5. Scoop a ladle or two of the hot cream mixture and add it to the gelatin mixture, mix until gelatin is dissolved.
6. Add gelatin mixture into the cream mixture and simmer for a minute or two.
7. Remove from heat and strain into a container with spout ( for easy pouring into the molds) and let it cool a little bit.
8. Using a small strainer, strain mixture while pouring into the mold. Make sure that it has cooled down before you cover it and refrigerate for 4 or more hours.
9. When ready to unmold, place the mold in warm water to loosen the edges. When loose, invert the mold into the serving dish and serve with honey mango sauce.


Honey Mango Sauce:

1/2 cup mango puree
1/3 cup honey
1/3 cup water

1. Peel and dice mango and place in blender
2. Add honey and water and then blend until smooth
3. Serve with mango panna cotta