Thursday, May 31, 2012

Mango Popsicle

Whew! Summer's definitely here...well, technically it is not quite summer yet since summer solstice is not until the 20th of June this year but the weather definitely says summer since it is so warm outside. I'd say that it is definitely beyond 80 degrees just from the feel of it. I can only imagine what the temperature would go up to in the actual summer months. While it may be a welcome change for those in the cold areas, it is not my favorite time of the year. Los Angeles is already warm most part part of the year but in the summer months, it is even warmer. I just hope that we won't have any heat wave this year.


I remember my first visit in LA (before I moved here permanently) was in the summer of 2000.  It seemed like the hottest time of the year and LA was experiencing a heat wave.  Can you imagine being in a theme park in the middle of a heat wave?  Ughhh, it was way too warm for me that I nearly fainted.  We had to cut our trip at Universal Studios short because I could not tolerate the heat. Maybe because of that bad experience that I have never ventured back to Universal studios.  I have been to Universal Citywalk more times that I can count (or care to count...hehehe) but not in the actual theme park.


Although summer months here in the US is between June to mid-September, summer in the Philippines is from the end of March to end of May.  Coincidentally, this falls around the same time as the summer break from school.  Summer, in the Philippines, is so harsh as temperature goes up to record high. The good thing is that there's breeze to help cool you down...although, for me, that is really not enough.  In my almost 20 years here in the States, I have only been back to the Philippines during summertime once and will probably not go back in the summer if I can help it.  I was drenched in sweat as soon as I step out of the house.  My dad's water and electricity bill rose up to a record high during our stayed there since hubby and I was taking showers probably 5-6 times a day as well as had the air conditioner runner almost 24 hours a day...hehehe


The summers spent in the Philippines did not bother me when I was growing.  In fact, we welcomed it with open arms as it meant that there's no school.  My friends and I used to play from morning until night with no care in the world.  We played traditional games like tumba-patis, hide-and-seek, Chinese garter, piko, pityaw, and enter-enter.  Okay, do not ask me to translate some of these game names to english because I have no clue ...Hahaha! These games allowed us to develop interpersonal relationships with our peers, get our daily dose of sunshine, and exercise.  This is what differentiates our generation from the children of today who are more into computer games and modern technologies.  We did not have Wii or iPad but we had so much fun. 

Summer months also meant local basketball leagues played by teams from the different villages in our housing compound.  I remember my friend Archie and I along with my aunts, siblings, and cousins will go to the village plaza every afternoon to watch the game and to root for our village's team.  Sometimes we will buy Indian mango (a local variety of mango that's best eaten when it is not quite ripe yet) or halo-halo (shaved ice with all kinds of preserved fruits and tapioca) to eat from the stands at the far end of the plaza while watching the game.  Thinking back, those games seemed really exciting ...  a lot of cheering and screaming in support of our team.  We would sometimes wake up the following day with hoarse voice from too much shouting...ah, those good ol' days...


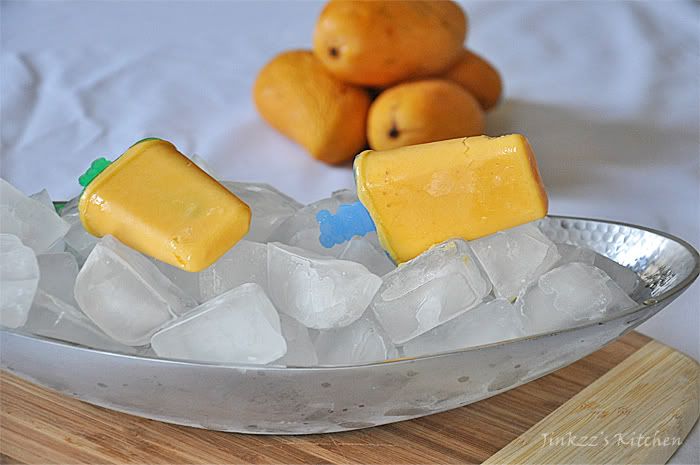
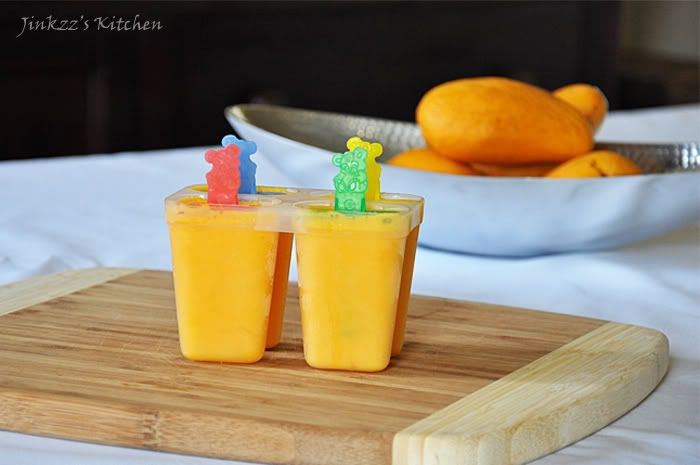
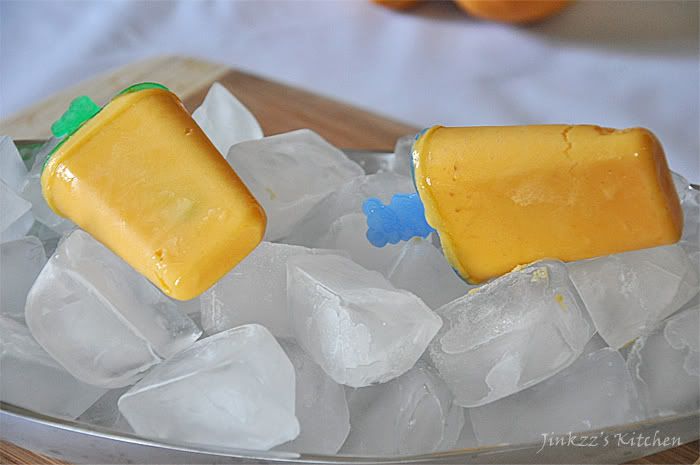
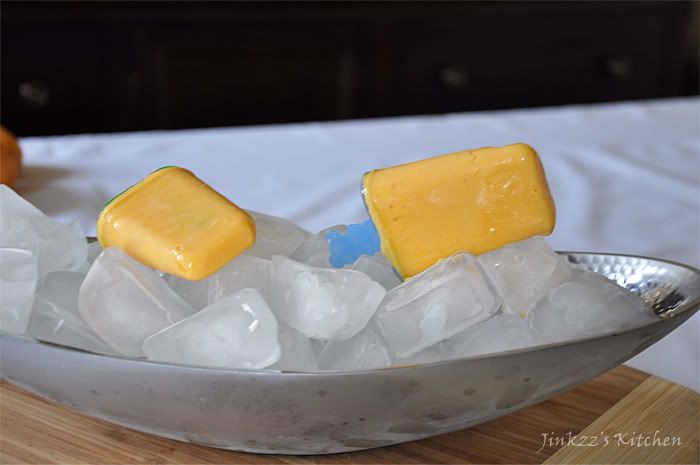
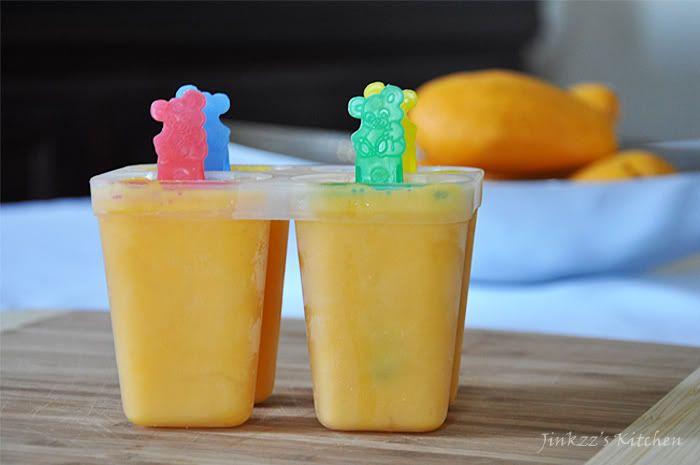
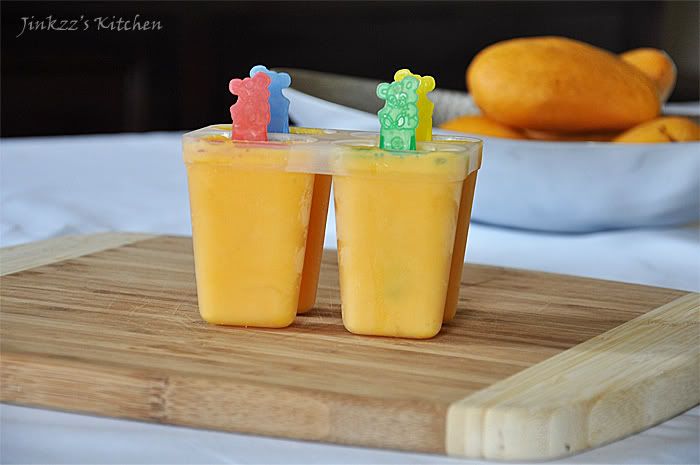
Another summertime treat are those locally-made popsicles.  They are referred to as ice candy or ice drop in the area where I grew up and are sold as street food.  The vendor often carry his product in an ice bucket, a container with cover made of entirely from styrofoam to keep it from melting in the summer heat.  The vendor would often sell his product on foot and carries a bell which he rings while shouting "iccceeee drooopppp, bakal na kamo sang iccceeee drooooppp" (Ice drop, come and buy some ice drop).  Children would often beg their parents for money to buy these delicious goodies.  We were no different from any children...we would ask my mom for money and buy these things despite the fact that we own a convenience store that carries different goodies.

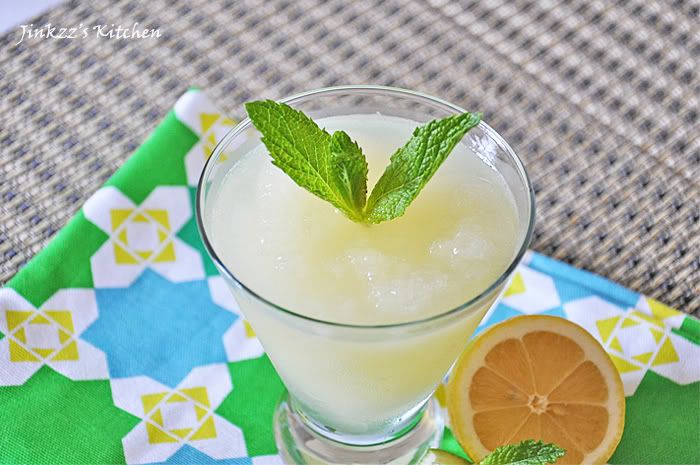
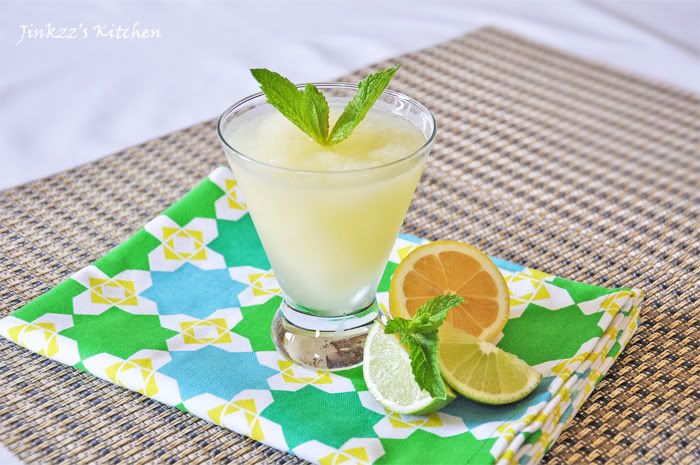
This dish, while it taste slightly different, is my homage to the summertime treat that I do not only love but also evokes fond memories of my childhood... a time when everything was so simple, basic, uncomplicated, and problem-free.  This taste different because I am using more milk and fruits as well as less sugar so it taste richer than the ones that are sold by the street vendors. 


Ingredients:

1 whole ripe mango, peeled and flesh removed.

1 cup milk (whole, 2%, non-fat- your choice)

Sugar, according to taste

1. Place mango and milk in a blender

2. Blend until well incorporated.

3. Add sugar according to taste then blend some more.

4. Pour in popsicle molds and freeze until frozen solid  (preferably 6-12 hours or overnight)

5. To unmold: place the mold in a pan of water for a minute or two to loosen.

6. Remove popsicle from mold and serve immediately.

NOTE: 

1.  If you do not have a popsicle mold, you can use a disposable cup or any kind of freezer-proof small cup.  
2. Pour the mixture into the cup and freezer until it freezes or solidify slightly before inserting your popsicle sticks in the center of the mold.  

3. Place back in the freezer to solidify (preferably 6-12 hours or overnight)

4. Unmold and serve.


Wednesday, May 30, 2012

Turkey, Spinach, and Pesto Panini

Good morning, World. I went to bed early last night so I woke up bright and early this morning...huh? Did those words come out of my mouth... este, did I really type those words? Hahaha...quite strange coming from a girl who is not always in a good mood in the morning. I am not a morning person but strangely I feel okay this morning...maybe because I got some much needed rest last night after a few days of not sleeping well. I tell you, I slept like a baby with a few dreams here and there but i cannot even remember those dreams when I woke up...strange, huh? 

Anyways, I have some blogging to catch up to so I will start with this entry and maybe back-track posts for the last two or three days and post entries for the dishes I cooked but haven't had time to post...hehehe...was busy with school trying to finish a paper that was due Monday so didn't have time to post...

I had an appointment with my therapist yesterday morning...hand therapist, not psychiatrist...hehehe.... and as usual I usually stop by at several shops before finally making my way home. In the process, I usually end up with tons of stuff by the time I reach home. What can I say? There are just so many temptations along the way. First, I stopped by at Whole Foods and picked up more arugula, ciabatta, and basil as well as well as corn, jam, and mustard. Next off, I went to Monsieur Marcel at the Farmemr's market and picked up prosciutto, and oven-roasted turkey breast from their deli section. Next, I went to World Market and La Surla Table(still at the Farmer's Market) and picked up some glasses, small dishes, and tea towels...Oh, the joy...they are like candy stores for the kitchen....too many pretty and shiny stuff :). Finally, I bought some fresh produce at the Farmer's market which were really great and fresh.


By the time I finally made it home, it was past lunch time. Unfortunately, there was nothing ready to eat at the house A quick rummaging on the cupboard and refrigerator and I found some ingredients I need to make a quick lunch...the result is a turkey, sinach, and pesto panini. I am telling you, I have been hooked on panini lately...hehehe... If you do not have a panini press or panini maker, refer to this post for idea on how to make it... it is easy and tasty


The combination for this pesto sandwich came from sister who told me after she saw the picture of my sweet chili, chicken, and pesto panini which I posted on my facebook account. I was a little skeptical at first because I was not sure how the wilted spinach taste in the panini but this converted me into a huge fan. Everything meshes well together perfectly and you cannot even tell that the spinach is in there which will be a good way to sneak veggies into your children's diet. I think it also helped that the roasted turkey breast from Marcel's taste great even by it itself. I was in panini heaven, so easy to make and tasty...a combination that's hard to come by....hehehe...

Even with the side salad and fruit cup, I was done in less than 20 minutes. I prepared a simple salad of baby spinach, pine nuts, and apple in a simple olive oil-lemon dressing to go with the salad. A fruit cup of mixed, sliced fruit such as apple, blackberries, and strawberries round out the meal. The fruits were part of the produce that I purchased from the farmer's market on Third and Fairfax.


Ingredients:

1 Rustic bread or any crusty bread, sliced in half

Prepared (I used my homemade) pesto

2-3 slices of oven-roasted turkey breast

a handful of baby spinach leaves

grated mozzarella or sliced provolone cheese


1. Spread pesto on both sides of the bread.

2. On one side, add a layer of cheese, then spinach.

3. Add turkey on another layer and top with another layer of cheese.

4. Cover with the other half of the bread and press down. Set aside

5. Heat your cast iron grill pan over medium heat.

6. Add about 1/2 a tsp of olive oil.  Using a non-stick, heat-resistant basting brush, spread the oil all over the grill pan.

7. Position your panini in the middle of the pan.  Place a layer of foil on top of the panini before placing you weight.

***make sure that the weight is stable and provides even weight on the panini.  I used a cast iron pan and then topped that with a cast-iron wok to provide a a heavier weight on the sandwich.

8. Grill each side for about 3-4 minutes or until it is toasted according to your preference.  When one side is done, use a spatula to turn it over and cook the other side using the same procedure.

9. When done, remove from heat and slice into two equal portion. Serve with potato chips, fried, salad or your choice of sides.


Friday, May 25, 2012

Sweet Chili, Chicken, and Pesto Panini

As I mentioned in my previous post, I stopped by at Whole Foods and found really good quality greens.  My finds included really fresh and good quality basil which were sold in huge bunches.  They looked really good that I picked up a couple.  I was planning on making a batch of pesto which is great to have around for quick pasta recipes, sauce for flat breads, and of course, panini... hehehe

The price per bunch is around $1.75 which is a steal considering the same amount of basil cost a little over $3 at Ralph's and Pavilions.  I know because I checked those stores a couple of days ago but didn't get any since their basil didn't look very fresh...they looked like they have been sitting on the chiller for about a week or so.  I do think the prices for fresh spices are outrageously high that sometimes it makes me want to plant my own...Oh, wait... I might end up killing them like I did my other plants...hehehe


Making your own pesto is really easy because it doesn't involve a lot of slicing or dicing.  All you need to do is place all the ingredients in the food processor and let it do all the hard work.  Washing all the small parts of the food processor afterwards though is the problem.  Too many small parts to clean and wash which requires hand washing to remove all the food particle that gets stuck in the nooks and crannies.  Having a homemade pesto though is, in my opinion, better than store-bought ones since you can control the amount of ingredients that you want to include.  I, for one, like a lot of garlic in mine so I usually put a whole garlic head instead of just a few cloves.  Besides, basil and pine nuts, you can practically use any nuts and greens of your choice to make pesto.  Besides the traditional basil/pine nut pesto, I also like arugula and walnut combo.


After making the pesto, I made chicken pesto panini to go with the wild arugula salad.  This is such an easy to make meal and with some shortcuts, they can be prepared in less than 30 minutes.  Panini is nothing more than a grilled sandwich.  No panini maker?  No problem because you can use you stove top cast iron grill pan.  Just make sure that it is well seasoned to avoid the panini from sticking otherwise you will have a mess on your hand.  And believe me, cleaning a cast iron pan with burnt, stuck-on food is no fun.  Besides the grill pan, you also need something to weigh your sandwich down.  My Le Creuset wok's function has been redefined to double as the weight for making panini...hehehe.


Ingredients:

Basil Pesto

2 cups packed fresh basil

1/2 cup freshly grated parmigiano reggiano

1 head of garlic, peeled (this is just based on my preference but you can use less if you prefer)

1/2 cups pine nuts

1/2 cup extra virgin olive oil

sea salt and freshly ground black pepper, to taste

1. Place garlic, pine nuts, and parmigiano reggiano in the food processor.  Pulse for a few seconds.

2. Add basil and pulse some more until it is slightly chopped.

3. With the food processor still going, add the EVOO in steady stream until blended.  Stop to scrape the sides occassionally and then pulse until well blened.

4. Season with sea salt and pepper according to taste.


Sweet Chili, Chicken, and  Pesto Panini

Ingredients:

skinless, boneless chicken breast, boiled and sliced

1 Cubanelle chili pepper - seeded, cored, and  thinly sliced (or any sweet chili pepper variety)

Basil Pesto

Shredded mozzarella cheese

sea salt and freshly ground pepper, to taste

ciabatta breads

olive oil

*** NOTE: you can determine the amount of ingredients to use per panini based on your preference.

1. Slice ciabatta into half.  Spread pesto on each side of the ciabatta.

2. On one side, place one layer of chicken.  Season with sea salt and pepper according to taste.

3. Add a layer of cubanelle chili pepper and top with mozzarella cheese.

4. Place the other halfof the ciabatta on top and set aside.

5. Heat your cast iron grill pan over medium heat.

6. Add about 1/2 a tsp of olive oil.  Using a non-stick, heat-resistant basting brush, spread the oil all over the grill pan.

7. Position your panini in the middle of the pan.  Place a layer of foil on top of the panini before placing you weight. 

***make sure that the weight is stable and provides even weight on the panini.  I used a cast iron pan and then topped that with a cast-iron wok to provide a a heavier weight on the sandwich.

8. Grill each side for about 3-4 minutes or until it is toasted according to your preference.  When one side is done, use a spatula to turn it over and cook the other side using the same procedure.

9. When done, remove from heat and slice into two equal portion. Serve with potato chips, fried, salad or your choice of sides.


Wild Arugula, Glazed Walnuts, and Apple Salad

I was over at Whole Foods today and they had really fresh greens which were begging me to take them home...really, they were, I swear :0 ...

 They had good looking wild arugula and basil which I bought and took home. I was thinking of using the basil for pesto since it has been a while since I've made some but the wild arugula is intended for a salad so I picked up other ingredients like glazed walnuts (they're great as they help to cut down cooking and prep time)as well as lemons and pine nuts (for the pesto). The only thing I forgot was to buy some pears which I only remembered when I was already halfway home. I could have stopped at another supermarket but the temperature was getting warm so I was really itching to get home as fast as I can. So instead of using pear, I used some gala apple instead which I already have in my refrigerator.


Arugula has a peppery, nutty taste to it. It is sold at the supermarket as either baby or mature leaves. Cultivated baby arugula are usually rounder in shape and often resemble the shape of a spinach only smaller. Will arugula, on the other hand has a stronger and more pronounced peppery, nutty taste to it. The shaped of the leaves are also slightly different in the sense that lobes and smaller in size. It is an annual plant that is rich in vitamin C and potassium. They were once considered aphrodisiac. It is great as a salad but it can also be used in pasta or pizza.


Ingredients:

5 oz wild arugula

1 apple or pear, cored and sliced thinly

1/4 cup store bought glazed walnuts

shaved parmigiano reggiano

salt and pepper, to taste


 1. Toss the first three ingredients together.

 2. season with salt and pepper according to taste

 3. top with shaved parmigiano reggiano

 4. Drizzle with dressing (see below)
Dressing:

10 Tbsp extra virgin olive oil

5 Tbsp lemon juice salt and pepper, to taste

1. Combine and whisk EVOO and lemon in a small container.

2. Season with salt and pepper according to taste.

 ***left over dressing can be kept in the refrigerator for a few days. Just make sure to let it thaw and shake well prior to use.

Thursday, May 24, 2012

Limeade

As mentioned in my previous post, I made both lemonade and limeade in one day.  Ha! that should clue you in as to how much I hate the heat.  And mind you, with the temperature outside being as high as it has been lately, I really don't mind having these ready in the refrigerator anytime.

Making these is as easy as 1,2,3 ... as long as you master the correct proportion, then you as set to go.  The only thing I hate about making these drinks is the amount of squeezing that is required.  Good thing I have an electric juicer so it takes the hard work out of the equation.


This is another great drink to quench the summer thirst away.  The good thing about these drinks is that they are not only easy to make but they can also be made way in advance.  Don't worry if you make too much because you can just pour them into your ice tray and pop in the freezer to make lemonade or limeade ice cube which when mixed with drinks won't water it down.  The flavored ice cubes are also great to use in frozen mixed drinks such as margarita. Or, they can also be used in ice tea to lemon/lime flavored tea. No need to add sugar in these tea since the ice cubes are already sweet.  Hehehe... I am telling you,,,the possibilities are endless.


Here's a tip for garnish:  before juicing the limes/lemons, remove the peel using a zester that allows you to make lemon or lime zest curls.  Shape them into curls and place in a freezer bag.  Place the bags in the freezer so they are ready whenever you need them.  To use as garnish, place on top of ice-filled glass with lemonade/limeade or any other drink you prefer.  Pour a little juice over it to de-frost and viola! they will look like they were freshly made.  The good thing about these frozen garnishes is that they hold their shape better than the fresh ones :) Also, they stick to the ice so they will stay afloat longer than the fresh ones.


1 cup freshly squeezed lime juice
3/4 cup sugar (may adjust according to taste)
4 + 1 cup water
ice cubes
Citrus curls (for garnish)


1. In a small sauce pan, add 1 cup water and 3/4 cup sugar. Heat until sugar dissolves. Remove from heat and let it cool. Set aside.

2. Using a juicer, extract juice from enough lime to produce 1 cup of lime juice.

3. Combine lime juice, sugar syrup, and water.  Mix well.

4. To serve, fill glass with ice.  Add limeade and top with citrus curls for garnish.


Frozen Lemonade

Ughhh... I swear summer came early this year....but, then again, it is practically summer all year long here in Los Angeles ...hehehe.... I guess it was silly of me to complain.  Unlike the rest of the continental US, the weather here in LA remains pretty constant all year long save for some very occasional rain and a few cool nights in the winter.  Other than those, it is sunny most part of the year. This is great for most people but this is torture for me.  Ha! that coming from a girl who grew up in the tropics :0  It also does not help that daylight saving time is in effect because the sun is out really early in the morning and is still up until about 7p.m. Aigoo, pure torture...


Having lived in LA for over 10 years, I still cannot seem to get adjusted to the weather.  I usually do my errands in the morning to avoid the scorching heat and keep the air conditioner running most part of the year (approximately 10 months).  The temperature these past few days was rather high and it does not help that my living room get the afternoon sun.  even with the air blasting, I can still feel the warmth coming in from outside despite having closed both the vertical blinds and drapes. 


Because of the unusually warm weather, I made some lemonade and lemon-limeade yesterday which are both great thirst-quenchers.  I made too much lemonade that it didn't fit in my pitcher so I poured some in several ice trays and popped them in the freezer.  I checked on them this afternoon and they froze nicely so I made this delicious looking frozen lemonade.  Instead of lemonade ice cubes, you can also make limeade ice cubes which are great as they can be used for frozen margaritas...just add tequila into the mix, coat the glass rims with salt, and you're ready to party...


Ingredients:

1 cup freshly squeezed lemon juice
1 whole lemon
3/4 cup sugar (may adjust according to taste)
4 + 1 cup water
ice cubes
Mint leaves (for garnish)


1. In a small sauce pan, add 1 cup water and 3/4 cup sugar. Heat until sugar dissolves. Remove from heat and let it cool. Set aside.

2. Using a juicer, extract juice from enough lemon to produce 1 cup of lemon juice.

3. Combine lemon juice, sugar syrup, and water.  Mix well.

4. Pour some of the lemonade in an ice tray and place in the freezer until frozen. Chill the rest in the refrigerator until ready to use.

5. To create frozen lemonade, remove lemonade ice cubes from freezer and place on a blender. Add three or four regular ice cubes and about 1/4 of a cup of chilled lemonade.

6. Blend until smooth.  You may add more ice cubes and lemonade to adjust taste based on your preference.

7. Transfer to tall glasses and garnish with mint sprigs. Serve immediately


Wednesday, May 23, 2012

Balut: A Unique Culinary Experience

Balut is a fertilized duck egg that has been hard-boiled. The eggs have been incubated for approximately 14-17 days. Balut is a Filipino delicacy but it is also found in other Southeast Asian countries such as Laos, Cambodia, and Vietnam. It is best when eaten while it is still warm. The "sabaw" or liquid soup that is inside balut taste really good. To save the "soup", you need to make a small opening at one end of the balut then sip the soup before making a larger opening to get to the rest of the balut. In the Philippines, balut is usually eaten with a sprinkling of salt and as an accompaniment for beer. In some culture, balut is considered an aphrodisiac.


Balut is sold as a street food which is very popular to people form all walks of life. As popular as it is though, balut is an acquired taste largely in part to the fact that it contains a fully or partially developed chick. Yeah, that might scare even the bravest of the culinary adventurers...hehehe. I, for one, am not too fond of the chick but I do love balut egg yolk which is a lot tastier than a regular egg yolk in my opinion. I mostly eat the yolk and either discard or give the chick to someone else. The egg white in balut is not edible because it is hard and rubbery. This one I usually discard.


I have fond memories associated with balut not because I like eating them but because it evokes a warm and fuzzy feeling. Back in the Philippines, Thursdays usually meant payday for those who works at the sugar central where my father worked which also houses a housing compound for employees and their family. Payday also meant there are a few vendors who sells their goods such as balut, seasonal fruits, and other food items to employees who pick-up their salary from one of the office buildings. My dad will sometimes bring us with him when he picks-up his pay envelop and buy us goodies... ahhh, life was simple then but the happiness brought by such a simple gesture is so profound. I do sometimes long for those times when media put less emphasis on commercialism and more on family. Or, maybe I was just too young to know any better...hehehe... anyways, those are part of the happy memories that will remain with me for as long as I live :)

Ingredients:

uncooked balut

water for boiling

salt, vinegar, or chili sauce (if desired)

 1. Place balut in a sauce pan and cover with water.

 2. Bring water to a boil over medium heat and boil between 20- 30 minutes

**** NOTE: I am not really too sure about how long to boil the balut. I searched the net but got different info. I boiled mine for about 30 minutes just to make sure that everything is cooked. 

3. Remove form heat, let it cool down a bit before serving it warm with a side of salt, chili sauce, or vinegar.
NOTE: I used pictures that are not graphic because I was scared that showing a full grown embryo in the balut might scare a lot of people. For a picture of balut with the full-grown embryo, you can refer to the ones posted at wikipedia. :)

Tuesday, May 22, 2012

Salted Egg Salad

When I cooked shrimp in salted egg yolks, I ended up with tons of salted egg whites.  It was such a waste to discard them so I used them in a dish that can be served as an accompaniment to any meal. This dish is categorically not a "salad" but more of a side dish. For lack of a better term, I am using the word salad loosely for its name...hehehe

Salted eggs are either duck or chicken eggs that has been kept in a brine solution for about a month.  After a month, the eggs are removed from the solution then hard-boiled.  The hard-boiled salted eggs can be kept in the refrigerator until they are ready to be used.  As the name denotes, the eggs are salty when eaten by itself.  Filipino cuisine have a few dishes that makes use of these but they are commonly served as an appetizer by dicing them then adding diced tomatoes, shallots, and vinegar.  


Making this dish is very simple as it does not require exact measurement.  You can just go by feel and preference but I will, however, post the proportion that I used when I prepared this one.  Although I only used salted egg whites (since that was what I had on hand), you are supposed to use both the salted egg whites and egg yolks.  

This dish is great when served with grilled or fried pork, dried fish, seafood.  


Ingredients:

7 salted egg whites (whole salted eggs preferable), diced
2 large Roma tomatoes, diced
4 small shallots, diced
2 cloves garlic, chopped finely
2 stalks green onion, sliced thinly and diagonally
1/4 cup vinegar (adjust to your own preference)
sea salt and freshly ground pepper, to taste

1. Assemble all ingredients in a non-reactive bowl.
2. Season with salt and pepper according to taste
3. Mix well and let it stand for about 15 to 30 minutes before serving.

Monday, May 21, 2012

Fried Shrimp in Salted Egg Yolk

I hope everyone's weekend was way better than mine.  I was in pain all weekend long as a result of yet another steroid shot to my injured elbow ...Ughhh, being the fourth shot within the last six months, I think they have outlived their usefulness.  As a result, there has been no significant effect on the pain anymore.  It is still at the same intensity as it was before the last one...they need to find a better treatment regimen for me... 


On the bright side, I cooked an excellent dish today.  Cooking is like my oasis in the desert that helps to keep me going when things are not going as they should.  It helped keep me sane when I went through a rough patch and still does help keep my brain occupied now since I do not use it as much as I did when I worked... another added advantage is that it helps exercise my elbow and hand to keep it moving....hehehe... okay, enough about my problem and moving on to the good part...


This dish is Chinese in origin but uses ingredients that are commonly used in Asian cooking.  One of the main ingredients which, in my opinion, takes this dish to an entirely different level is the addition of salted egg yolks into the sauce.  The salted egg yolks just makes the sauce creamy and tasty.  Although salted egg yolks were used in the dish, surprisingly, it is not salty at all so do not be afraid of seasoning your shrimp or adding salt to the cornstarch or all-purpose flour used in dredging the shrimp prior to frying.  


Serve this with a piping hot bowl of steamed rice and use your hands to dig in.  While that may sound barbaric or crude to a lot of people, I do think this is the best way to eat this dish...hehehe....that's just the Filipino way of enjoying a meal.  Of course, I have never been too good with using my hand to eat rice with but I definitely use my hands to peel the shells off the shrimps and dunk it in its sauce.  The shrimps are good but the sauce is divine... As the Kentucky Fried Chicken slogan goes, these babies are finger lickin' good

BTW, do not throw away the salted egg whites since that can be used in another dish which, in my opinion, is a great accompaniment to this dish.  Recipe will follow.


Ingredients:

1 1/2 lbs large shrimps

1/2 cup cornstarch

salt and pepper, to taste

1/4 cup oil

1/2 block butter

1 head garlic, peeled and finely chopped

6 hard-boiled egg yolks, mashed


1,  In a bowl, mix cornstarch, salt and pepper.

2. Lightly dredge the shrimp in cornstarch mixture, shake off excess.

3. Heat a non-stick wok over medium heat.  Add oil.

4, When oil is hot, add shrimp and lightly saute.  Cook until shrimp turns orange in color then immediately remove from heat.  Transfer shrimp to a paper towel lined plate to drain excess fat.

5. Add garlic to the oil and saute until fragrant and soft.

6. Add salted egg yolks and stir to dissolve.

7. Add shrimp back to the wok and stir to mix.

8. Remove from heat and serve.


Saturday, May 19, 2012

Chicken Adobo in Coconut Milk

Adobo is probably the most famous of all the Filipino dishes. Adobo is a spanish word which means seasoned or marinated dish. There have been so many variation of this dish as there are Filipino dialects. The way this dish is cooked, most often, is dependent on the geographical location where they originated. This is similar to the Korean kimchi which is representative of the Korean cuisine but the preparation, ingredients used, and method of preparation varies from place to place and region to region.


In the Visayan region (Negros Occidental province) of the Philippines where I am from, we usually use a lot of soy sauce to make chicken or pork adobo. Aside from chicken and pork, we also use seafood such as squid to create this dish. Another famous adobo variation that we have in Negros Occidental is apan-apan (in the Ilonggo dialect)or adobong kangkong (in Tagalog). Kangkong is known as swamp spinach in english. Apan-apan though is technically not a typical adobo dish since it uses shrimp paste or bagoong instead of soy sauce.


The dish that I made today is not a typical Visayan recipe since we do not use a lot of coconut milk in our cooking except for the different rice cake dishes. This dish, chicken adobo sa gata, originated from the Quezon province which is located in the upper portion of the country, the Luzon region. This dish is quite easy to make and can either be made spicy or not depending on your preference. The version that I made is a non-spicy variation. To make the dish spicy, you can just add Thai chillies. This dish is delicious with steamed rice.


Ingredients:

2 lbs chicken ( I used a combination of wings and boneless, skinless breast)

1 can coconut milk

1/2 cup white vinegar (you can use less if you prefer it less tangy)

1 medium shallot, finely chopped

3 cloves garlic, finely chopped

1 thumb sized ginger, peeled and sliced thinly

oil for browning

1/4 tsp whole pepper corn

sea salt and freshly ground pepper to taste

3 pieces of bay leaves


1. Slice chicken into bite size pieces.

2. Season with salt and pepper according to taste. Set aside.

3. Heat sauce pan over medium heat and add oil.

4. When oil is hot, add ginger, shallot, and garlic and saute until fragrant and translucent. Add chicken pieces and brown all sides.

5. Let all of the natural juices to evaporate before adding vinegar.

6. Let vinegar boil first before stirring to mix.

7. Add coconut milk, bay leaves, and pepper corn.  Lower the heat to medium low and let it simmer until chicken is tender.  Don't forget to stir occasionally to prevent the bottom from burning.

8. Let the sauce reduce and thicken before removing from heat.

9. Transfer to a serving dish and serve with steamed rice.


Friday, May 18, 2012

Apple-Cinnamon Pancake with Butter and Maple Syrup

This day started out all wrong. I was awoken by a phone call at a little past 8 am which was way too early for me to wake since I hardly had any sleep the night before and was tossing and turning. I think it was partly due to the pain on my left elbow and partly due to the fact that I took a nap late afternoon the day before. By the time I hang up the phone, I was wide awake and couldn't go back to sleep so I finally dragged myself out of bed, washed my face, brushed my teeth, and went to the kitchen to brew some coffee. I do not know if it was because I was still sleepy or maybe it was just the fact that I wasn't thinking straight but I forgot to place the coffee filter holder before putting the coffee filter and ground coffee on the coffee maker. I went to the living room to turn on the television and watch Gin Tama (Japanese anime series that I am currently watching)while I was waiting for the coffee to finish brewing. When I went back to the kitchen a few minutes later, I had a mess on the counter with brewed coffee and coffee granules splattered all over. Ughhh...not good way to start my day, indeed. Luckily, the mess was nothing that a roll of paper and a little elbow grease was able to take care of.


Ahhh... I am not much of a coffee drinker these days and have, for a few years now, been a tea drinker but every now and then I do reach for the coffee mug and trade my tea collection for a cuppa coffee. I think I should just stay on drinking green tea which is a far better choice than coffee...hehehe. Anyway, that incident set me back time-wise so instead of making homemade pesto for my intended chicken pesto panini, I reached for a package of pancake mix to save some time. Store-bought pancake mixes are great to use when you are crunched for time since they only need water addition and ready for cooking. I did, however, added a few key ingredients to make it taste homemade rather than generic. With the addition of grated apple and cinnamon, the taste improved significantly. I drizzled maple syrup with butter and arrange a few slices of apple on top...sinfully yummylicious!!


Ingredients:

2 cups pancake mix
1 1/2 cups cold water (per pancake mix manufacturer's recommendation)
1/2 tsp cinnamon powder (less if you prefer)
1 apple, cored and then grated oil for cooking


1. In a bowl, add pancake mix and cinnamon powder. Stir until well combined.

 2. Add cold water and mix to moisten ingredients. The batter may still be a little lumpy but try not to overmix.

 3. Stir in grated apple and mix until combined.

 4. Heat a griddle (or skillet) over medium heat.

 5. Grease the entire surface of the griddle or skillet with oil. Do not put too much oil though but just enough to cook the pancake.

 6. When the griddle and oil is hot, add about a quarter or half a cup of the batter into the griddle.

 7. Cook until you see some bubbles on the surface of the batter.

 8. Using a non-stick spatula or turner, carefully loosen the bottom of the pancake and then turn over to cook the other side.

 9. Cook until done which would probably take about a minute to a minute and a half.

 10. Continue cooking until you've used up all the batter. Add oil as needed to prevent the pancake from sticking to the pan.

 11. Serve warm with a few sliced apple arranged on top and drizzled with butter and maple syrup mixture.


Butter and maple syrup compound

Ingredients: 1 (240 ml) bottle of maple syrup

1/2 a block of butter

 1. Cut butter into an inch thickness.

 2. In a small sauce pan, add maple syrup and butter.

 3. Heat over medium to low heat and cook until butter melts.

 4. Stir until well incorporated.

 5. remove from heat and keep warm.

 6. Use this to drizzle over your pancakes or waffles.